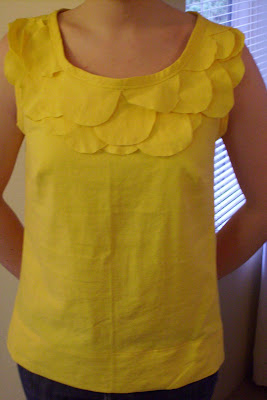
How to make a petal top
Like, wow. This is one of those "oops... got too excited and didn't do my research before jumping in..." projects. Let me back up.
Since spring of 2009 when I saw I Love You, Man in theaters, I have been gaga over bright yellow and I loooove the wardrobe of Rashida Jones's character. Seriously, when you need some eye candy and wardrobe inspiration, watch this movie. One of the items I really covet is this little yellow top she wears:
So I thought, oh, I can make that! It's semi-sheer, bright yellow, and looks like it has petals all over the front. I went to my fabric stash and found a yard of yellow cotton/linen blend, much heavier than the original, that I bought for $3 or $4 a yard on sale at JoAnn's a while ago.
I didn't really care about the sleeves, so I used this pattern that I've come to like for the basic top structure:
I use style A/B with my own trim! I did it here too.
So anyway, here's the tutorial.
- Get a basic top pattern that you like. Cut out the front and back and whatever other pieces you need (I just needed bias strips for binding the neck and sleeve openings).
- Cut out your petal shapes (on a band), in alignment with the neck edge of the top. See, I matched up the neckline to my petal pieces so that they would curve perfectly around the neck. I left that extra 1/2" on the petals because I figured my bias edge would cover it. I didn't really think ahead to the other rows of petals. Oops.
Even it up.
Cut out your petal shapes from the bottom of the band, leaving 1/2" at the top:
Use these petals as a pattern for the next several rows:
- Some of my petals were cut in half, so I sewed them up and pressed the seams open:
- Total, I used 25 petals. Cut this many, and read the next step below:
- I had petal trains of different sizes, which was fine since they will lay staggered on the top. Here's the funky part: depending on the fabric you use, you could do this part one of several different ways. I used heavy linen look fabric, but if you used a lightweight or semi-sheer cotton, you would CUT TWICE AS MANY PETALS, sew them right sides together, press and turn them right side out, so the petals would have no raw edges. You could apply them to the shirt differently, too. If you had medium-weight fabric, you could turn under a 1/4" hem on all the petal edges, so they would show topstitching but no raw edges.
- I have heavy fabric, so my petals will hold up without a second layer or hem. To protect their shape a little and give them some finish, I will stitch through them 1/4" in from the edge.
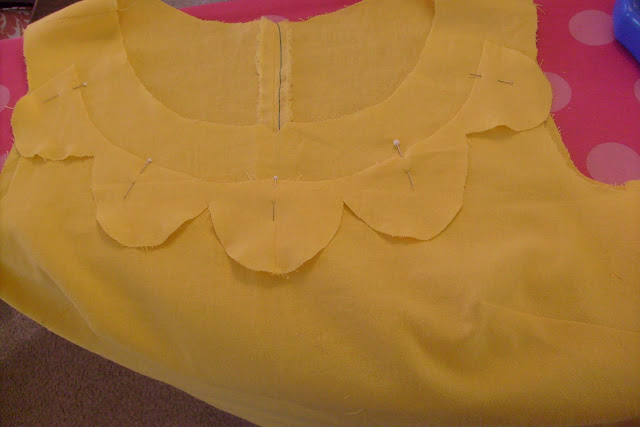
- Using whichever finishing method you need based on fabric weight, pin your petals down at the bottom row.
- Sew those down and pin the next row, and the next (I used four rows of petals in the front, each 1/2" above the next).
- Next, I looked at my extra petal pieces and decided to arrange them around the back of the neck, too. I used some of my individual petals for this:
- Sew those down.
- Now, finish the neck and sleeve edges however you want to. I used bias strips, you could give it sleeves or facings. A hidden neck facing would have looked good, I should have done that... darn.
- That's it! See?


I said this was a sort of frustrating project. Here's why. About half way through the process I explained above, I did some more internet research and found more pictures of the top.
There was some buzz about it when the movie first came out, and I was able to ascertain that it is by Pringle of Scotland, sold for $750 on Net a Porter. Oh, and it's sold out. Seriously, $750??? Seriously? Here it is. It's called the "Disc detail top"--yeah, that's right, "discs," not petals.


I still like how it turned out, mind you, and I will still wear it. But stay tuned, because I am planning on doing a tutorial for a disc top sometime soon. I am determined to copy that shirt!! I have some semisheer navy cotton that would be nice. Trust me, I will do a tutorial for this exact top. ;)


I am in love with your blog you are so creative! Thanks for all the great DIY's I will totally be trying out some!
ReplyDeleteThe top came out great. Love it! So glad I found your blog.
ReplyDeleteJulie
It's very cute! You did a wonderful job! I love the color.
ReplyDeleteYou got a good close-up of the discs. Looks like they are finished with a narrow serged hem or rolled hem and then overlapped and sewn down. Good luck on knocking this one off.
ReplyDeletevery cute! i actually like the your petal shape more than the disc shape. well done.
ReplyDeleteSuper cute! I love it!
ReplyDeleteI love it! This is one of those garments where you get into it and really have to think about how it's constructed. I would have gotten hung up on the hems of each disc/petal so I'm glad you went over your thoughts on that.
ReplyDeleteI like yours way better than the disc top. Adorable. But I completely understand the "I have to copy it and get it right" feeling.
ReplyDeleteSo cheery! I love what you've been doing lately, it's all very inspiring. Can't wait to see round 2 with this shirt, although I love this version!
ReplyDeleteI love your version!!! Very cute.
ReplyDeleteYou are my kind of girl! I have always been a copier of something I loved. When I was a young girl in High School, I would have to catch a bus to get back home. I had to wait in front of a very expensive dress shop. I fell in love with this beautiful jacketed dress. I sent away for the a fabric that looked just like it and copied it right down to the pin on the lapel. I got so many compliments on my outfit, and it really built my confidence in sewing. I have won many award in sewing since then...with just my HS sewing. You can do anything with a little confidence.
ReplyDeletePattyjo
very pretty! I have some red linen that I have not known what to do with, and this may be it!
ReplyDeleteI too like your top the best!
ReplyDeleteKathy
Love it, as always. Thanks for sharing with us, you inspiration, you!~
ReplyDeleteI just found your blog, and love your adventure-some spirit! :)
ReplyDeleteUgh - I've done my share of copy-cat oopses. But I actually think yours looks better than the (ridiculously overpriced) off the rack one! Those random "discs" just look weird. And being that yours is linen, it'll probably last way longer too. Great job - don't feel bad at all! P.S. Found you on One Pretty Thing.
ReplyDeleteso cute! I love that movie!!
ReplyDeleteLovely..
ReplyDeleteI'm loving this! Nice work!
ReplyDeleteAhh!! When I saw this movie I fell in love! I'm so excited you did a tutorial for this. I need to go find a basic top pattern and get started on this. Thanks so much :)
ReplyDeleteLove the blouse, and I have the basic pattern that you used. For those with embroidery machines and software, I would create the circles....ummm, discs in embroidery software and stitch them ITH (In The Hoop) You could hoop a washaway stablizer and the fabric together, stitch out the circles and use a stencil tool cut around them. Either hand stitch or bar tack the discs onto the blouse with a conventional sewing machine.
ReplyDelete